Does your potted citrus look worse than it used to? Maybe growth has stalled, leaves are turning yellow, or water seems to run straight through the pot. Before reaching for more fertilizer, take a closer look at the roots and potting mix. The tree may have outgrown its container.
I love growing citrus in containers. They make it possible to grow a tree on a patio, in a rental garden, or in a cold climate where it needs to move to protection for winter. Containers also help keep trees a manageable size and their roots out of nearby garden beds. But keeping citrus happy in a pot long-term means occasionally making room for fresh soil and healthy root growth.
My dwarf Valencia orange tree was ready for that attention. It had yellow leaves, unusually small fruit, and roots escaping its whiskey barrel. Here is how I refreshed it, along with the timing, root pruning, and aftercare that matter most.
Key Takeaways
- Escaping roots, shrinking mix, stalled growth, and yellow leaves can signal that container citrus needs repotting.
- Repot in early spring, refreshing the existing container or choosing one only slightly wider.
- Trim circling roots and replace tired mix without planting the tree deeper than before.
- Support recovery with thorough watering, temporary bright shade, and delayed fertilizer until new growth appears.
Table of Contents
- How to Tell When Container Citrus Needs Repotting
- Refresh the Same Pot or Move to a Larger One?
- The Best Time to Repot Citrus
- Prepare the Tree, Tools, and Work Area
- Remove the Tree and Inspect the Roots
- How I Root Prune a Large Container Citrus Tree
- Check Drainage and Refill With Fresh Potting Mix
- Add Worm Castings and Mulch, but Wait on Fertilizer
- Aftercare: Water, Shade, and a Light Canopy Trim
- Common Citrus Repotting Mistakes to Avoid
- Put the Next Soil Refresh on Your Calendar
How to Tell When Container Citrus Needs Repotting
Over time, potting mix breaks down and shrinks while roots continue filling the container. Eventually, there is less usable growing mix around those roots, and the balance of moisture and air is no longer what it should be. Water may pass through without adequately moistening the root ball.
Look for several clues together rather than assuming every yellow leaf means the tree is rootbound:
- Roots growing out of drainage holes or into the ground beneath the pot.
- Potting mix that has noticeably shrunk or settled.
- Water running straight through the container.
- Yellowing leaves and stalled growth.
- Fruit that is smaller than expected.
- A tree that looks much too large for its pot.
- A container that is bulging or cracking from root pressure.
On my Valencia, the escaping roots were especially telling. They had grown out of the barrel and into the surrounding area, apparently headed toward a nearby garden bed. That rather defeats one of my reasons for using a container!
The fruit was another clue. A dwarf citrus tree stays smaller, but that does not mean its oranges should be tiny. This tree had plenty of fruit, but the size was not what I wanted.
Refresh the Same Pot or Move to a Larger One?
A rootbound citrus tree does not automatically need an enormous new container. You have two options:
- Refresh the existing container: Trim the roots, replace tired potting mix, and return the tree to the same pot. This is the approach I used with my whiskey barrel.
- Pot up: Move the tree into a slightly larger container with fresh mix around the root ball.
If you are potting up, choose a container only 2 to 4 inches wider than the current one. A much larger pot holds moisture longer, which can slow recovery. Bigger is not always better, especially when the roots have just been disturbed.
The Best Time to Repot Citrus
Early spring, before the main flush of growth, is the best time to repot container citrus. Avoid repotting in winter, especially when the tree is indoors, and avoid major root work during extreme heat.
Whenever possible, work in a shaded spot rather than leaving the exposed root ball in direct sun. I had more sunshine than I would have preferred while working on this tree. A shadier setup would have been better.
I originally potted this Valencia in 2020, and by 2026 it clearly needed a refresh. Could I have done it once in between and forgotten? Maybe. But there was no question it needed attention now. Ideally, this is a job to assess every few years, not something to put off until the tree looks unhappy.
Prepare the Tree, Tools, and Work Area
Remove fruit before significant root pruning
When I am doing substantial root work, I remove the fruit first. The tree is about to lose some roots, and I want its energy going toward recovery rather than ripening oranges.
It can be hard to take off a crop, even a small one. But my priority with this tree was healthier growth and better fruit in the future, not keeping every orange it had already set.
Gather everything before tipping the pot
This is a messy job. A tarp underneath the work area helps keep loose soil, roots, and trimmings corralled. It does not have to be as enormous as the one I used!
Have these supplies ready:
- A tarp.
- A sharp, sterilized saw.
- A long knife or hori hori.
- Clean hand pruners.
- Fresh container potting mix.
- Worm castings.
- Mulch.
I watered the tree thoroughly a couple of days beforehand so the roots would not be going into the process dry. That also meant the barrel was heavy. A whiskey barrel full of moist mix and a citrus tree is not something I wanted to wrestle with alone, so my son Grant helped tip it over and later lift the tree back in. Arrange help before you need it.
Remove the Tree and Inspect the Roots
Carefully tip the container onto its side. Check for roots growing through the drainage holes and cut those free. If the root ball is stuck, run a long knife along the inside edge of the container to release it.
My tree needed a little of both. There were roots outside the barrel and others holding tightly along its sides. Once we freed them, we could ease the root ball out onto the tarp.
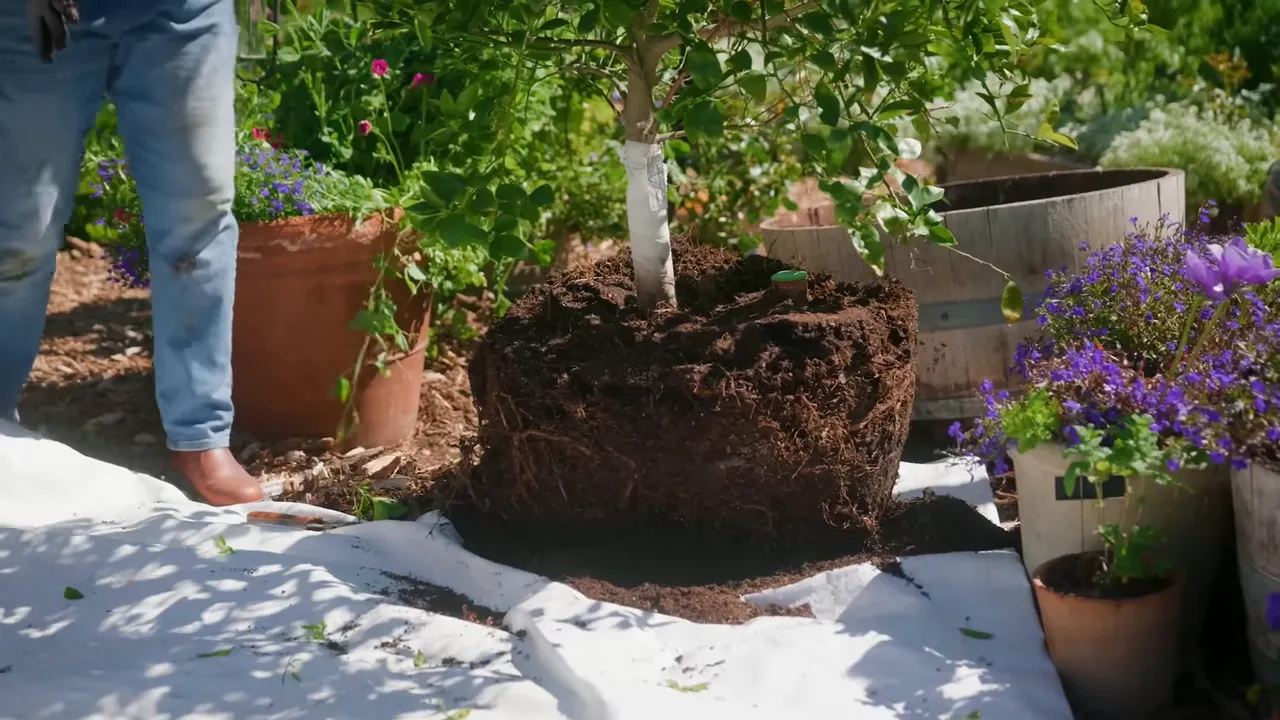
We also found quite a collection of grubs beneath the barrel. Those went straight to the chickens, who were delighted with their unexpected feast. Finding them was part of inspecting what was going on around the pot, but the clear problem I needed to address was the crowded, circling root system.
The goal of root pruning is to interrupt those circling roots and encourage new roots to grow outward into fresh mix.
How I Root Prune a Large Container Citrus Tree
Once the tree is out, take time to look at how the roots are growing. On this large, overgrown root ball, I used the following approach:
- Trim the bottom. Cut off the bottom 1 to 2 inches of the root ball.
- Shave the sides. Remove about an inch from around the outside.
- Loosen the outer roots. Gently work through the remaining surface roots so they are not left in the same tight pattern.
- Cut thick circling roots. Remove large roots wrapping around the root ball, especially those turning back into themselves or wrapping near the trunk.
- Inspect again. Rotate the root ball as needed and check for problem roots you missed.
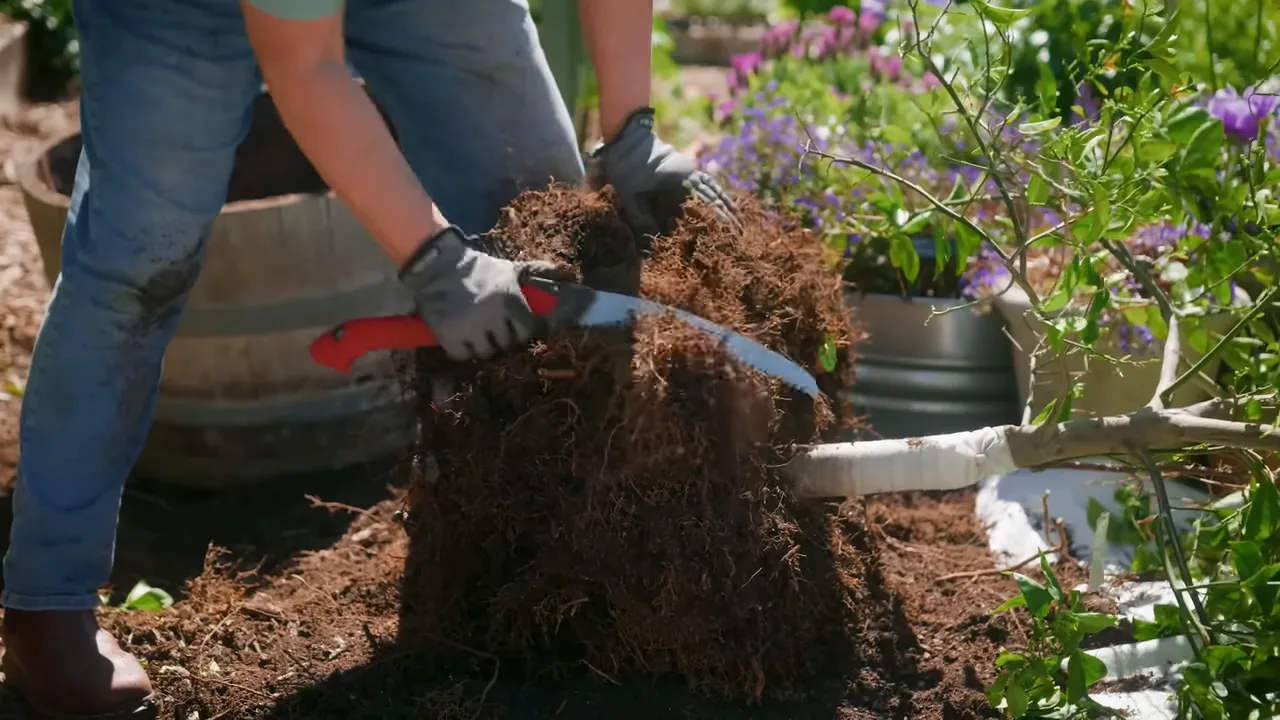
Some of the roots on this tree had grown into thick loops. Others seemed to have worked into the wood of the barrel. I cut the larger problem roots with pruners and used the saw to trim the dense outer root mass.
It looks dramatic, and it is stressful for the tree. But leaving those roots circling indefinitely is not a good solution if the tree is going to stay in a container. The fresh space around the trimmed root ball is where I want new roots to develop.
What about an olla inside the root ball?
I had a medium-size olla, a buried clay watering vessel, in this barrel. By the time I removed the tree, the roots were well established around it. I left it in place rather than trying to pull it out and replace it.
Here in Arizona, I think ollas earn their space. They can help maintain steadier moisture and reduce water waste in a hot, dry climate. There are trade-offs, though: they take up room that roots could use, and large roots can eventually crack them.
A large olla would take up even more space. I sometimes use that size in whiskey barrels planted with flowers, but for this citrus tree, I prefer to leave as much root room as possible.
Check Drainage and Refill With Fresh Potting Mix
Before the tree goes back in, inspect the drainage holes and clear away any roots blocking them. Water needs a way out. I do not want newly pruned roots sitting in a waterlogged container.
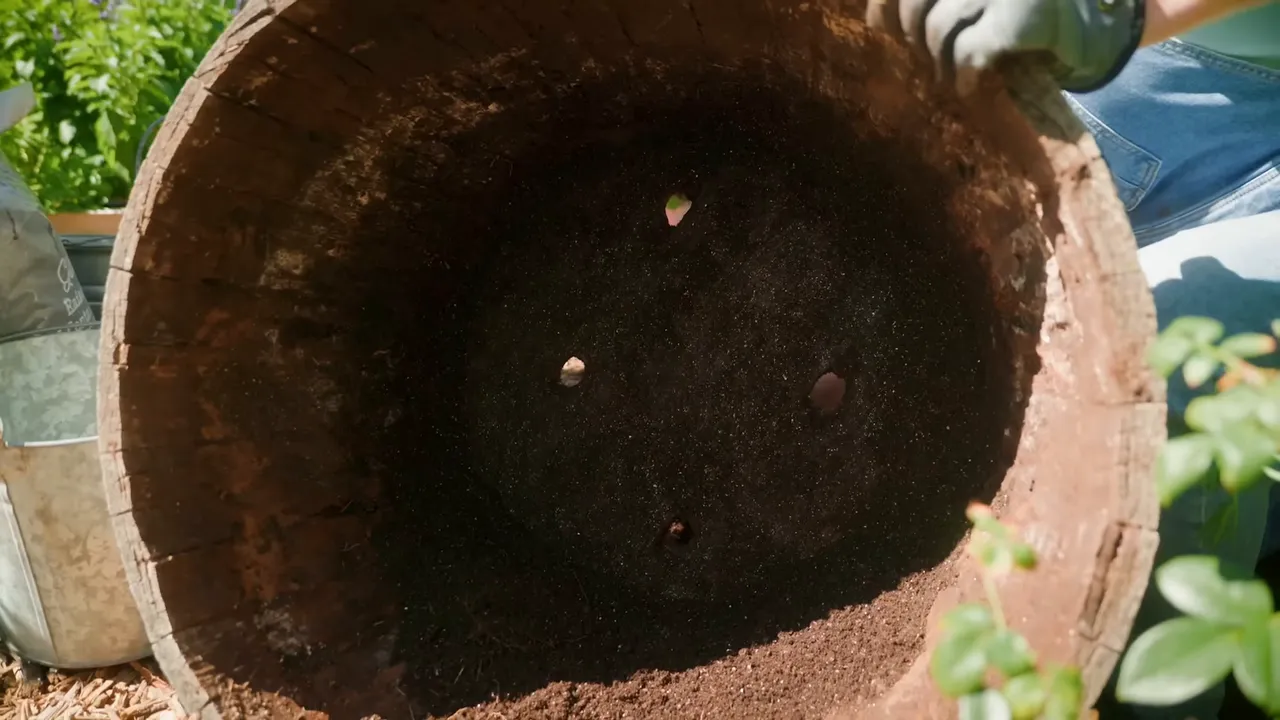
My barrel had four drainage holes, which had been adequate, and they were clear after removing the roots. The important point is that the drainage works for the container, not that every pot needs exactly four holes.
Move the empty container into position before refilling it. It is much easier to shift an empty barrel than one holding a tree and fresh mix.
Choose a mix with drainage, moisture retention, and structure
I want container mix that drains well but still holds moisture, with ingredients that help it maintain structure rather than collapse quickly. Perlite and coconut coir are ingredients I like for that balance.
For this tree, I used Arizona Worm Farm Raised Bed and Container Mix, which has worked well in my containers. The mix includes perlite, coconut coir, compost, worm castings, and mineral amendments.
Keep the tree at its original planting depth
Add fresh mix to the bottom, then lower the tree into the container. Check both its position and height before filling around the sides. This was another moment when I was very thankful for Grant’s help.
Do not plant the tree deeper than it was before. Keep the top of the original root ball visible rather than covering it with a thick layer of new soil, and do not mound mix against the trunk. Adjust the mix underneath if you need to change the height.
Once the tree is centered and sitting correctly, fill the space around the trimmed root ball with fresh mix.
Add Worm Castings and Mulch, but Wait on Fertilizer
I top-dressed this tree with worm castings to support microbial activity as it recovered. Then I added mulch, keeping it a little away from the trunk.
What I did not add was citrus fertilizer. Right after major root pruning, I am not trying to push a flush of leafy growth. I want the tree to recover and rebuild its roots first.
Wait until the tree is recovering and showing new growth before adding fertilizer. More fertilizer is not a substitute for giving disturbed roots time to settle in.
Aftercare: Water, Shade, and a Light Canopy Trim
The work is not finished when the tree is back in its pot. Aftercare is an important part of helping it recover.
- Water thoroughly immediately after repotting.
- Provide bright shade for 1 to 2 weeks. If the container is too heavy to move, add temporary shade where it stands.
- Check the soil before watering again. Water when the top couple of inches feel dry rather than following a fixed calendar.
- Keep an eye on moisture. Do not let the root ball dry out completely, but do not keep watering already-wet mix.
- Hold off on fertilizer until recovery and new growth are underway.
After pruning the roots, I also reduced this tree’s canopy a little. I used clean pruners and made selective cuts just above another branch, taking off a modest amount rather than stripping the tree.
Be mindful of sun exposure as you prune. I did not want to expose too much bark to Arizona sunshine, and any newly exposed bark needed protection.
This tree may look worse before it looks better. Some wilting and a sad-looking period are possible after substantial root work. I am hopeful about its recovery, but I am not expecting it to look perfect immediately. My job now is to monitor moisture closely and reduce stress while it settles in.
Common Citrus Repotting Mistakes to Avoid
- Choosing a much larger pot: Increase the width by only 2 to 4 inches when potting up.
- Working at the wrong time: Avoid winter repotting and major root pruning during extreme heat.
- Fertilizing immediately: Let the tree recover before encouraging more top growth.
- Burying the tree too deeply: Maintain its original planting depth.
- Waiting for serious decline: Check the roots and condition of the mix before the tree becomes visibly stressed.
Put the Next Soil Refresh on Your Calendar
I am making a note of when I refreshed this tree and setting a reminder to reassess it in about three years rather than waiting another six. That does not mean every citrus tree needs the same schedule. It means I want to check before yellow leaves, tiny fruit, and escaping roots make the decision for me.
Refreshing the mix and managing crowded roots every few years is how I plan to keep container citrus productive long-term. It gives the tree room for healthier roots, more effective watering, and better growth without requiring an endlessly larger pot.
For more everyday care tips, see my guide to growing citrus in containers. If your tree spends part of the year indoors, the University of Minnesota Extension’s guide to growing citrus indoors is another useful reference.
|