It’s no secret that I love to garden vertically. Spend a little time in my garden, and you’ll find everything from old ladders and simple stakes to custom welded arches. If a structure gives plants a place to grow up, I’m probably willing to try it.
The biggest reason is simple: growing vertically gives you more room to grow. Instead of letting vines take over the ground, you can use the space above your beds, along a wall, or over a pathway.
You don’t need an expensive garden tunnel to get started. Some of my most useful supports come from the hardware store or a thrift shop. Here are the vertical gardening structures I use, how they’re installed, and the trade-offs to consider before adding them to your own garden.
Table of Contents
- Why Grow Vertically?
- 1. Electrical Conduit Trellis: A Simple, Customizable DIY Option
- 2. Wall-Mounted Rebar Trellis: Turn a Blank Wall Into Growing Space
- 3. Pre-Assembled Trellises: Convenient, but Check the Support
- 4. Wall-Mounted Grid Trellis: Cover a Wider Area
- 5. Raised-Bed Rebar Trellis: Support Crops and Seasonal Shade
- 6. Old Ladders: An Inexpensive Way to Grow Up
- 7. Jardin Rose Arches: Ready-to-Assemble Height Over a Path
- 8. Poles and Stakes: Sometimes One Upright Is Enough
- 9. Ladder Mesh Block Trellis: My Favorite Temporary Support
- 10. Vertex Cages: Add Support After Plants Are Growing
- 11. Custom Welded Arches: A Permanent Garden Tunnel
- The Most Important Vertical Gardening Habit
Why Grow Vertically?
Extra growing space is only the beginning. Getting plants onto a trellis makes caring for them easier in several ways.
- More air and sunlight reach the plants. Better airflow helps create healthier growing conditions and is one part of managing diseases such as powdery mildew.
- Plants and fruit spend less time on the ground. In my garden, roly-polies and other ground-dwelling pests are quick to take advantage of plants resting on the soil. Growing up helps move the crop away from them.
- Problems are easier to notice. It’s much simpler to inspect leaves for pests and disease when you aren’t digging through a sprawling pile of vines.
- Flowers and developing fruit are easier to find. You can spot female flowers that may need pollination and keep track of fruit as it grows.
- Harvesting is easier. Ripening vegetables are more visible and accessible, without stepping on vines to reach them.
If you’re deciding what to plant on your supports, my guide to vegetables that love to climb is a helpful place to start.
1. Electrical Conduit Trellis: A Simple, Customizable DIY Option
The first vertical structure I added to my garden was made with electrical conduit, plumbing fittings, and a wire panel. It’s still one of my favorite practical solutions because the materials are readily available and the design can fit your space.
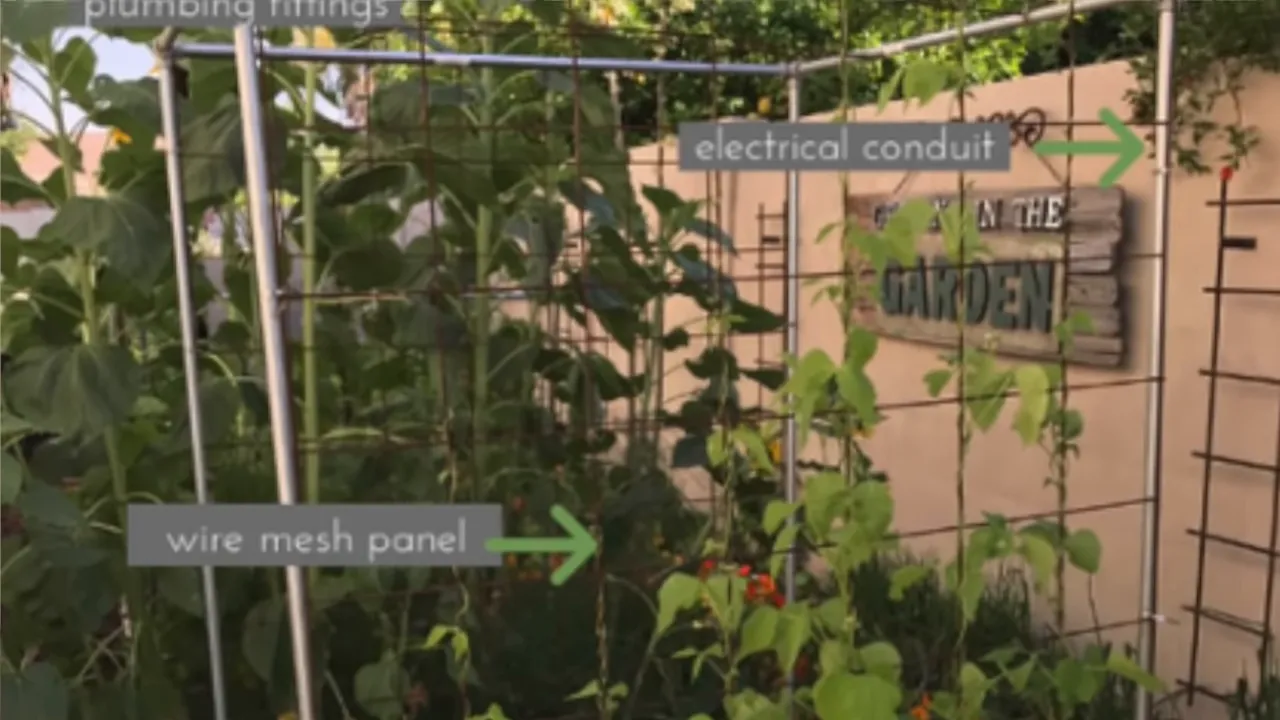
How I put it together
- Have the conduit pieces cut to the lengths you need. I had mine cut at the hardware store.
- Connect the pieces with plumbing fittings to form the frame.
- Attach a wire panel to the frame with cable ties.
- Drive a 2-foot piece of rebar about 1 foot into the ground at each upright.
- Slide the conduit uprights over the exposed rebar.
The rebar holds the frame securely in place. Having the pieces cut beforehand also keeps the assembly simple, without needing cutting tools at home.
I use this basic design as a flat trellis and as an overhead structure. For the overhead version, two taller frames connect across the top. The wire panels bend over the upper edges. Mine don’t quite meet in the middle, but the vegetables still manage to make their way across.
One change that has made a big difference: use metal cable ties. Even heavy-duty plastic ties eventually bake apart in the Arizona sun. The metal ones have lasted much longer for me.
The trade-off: This is an inexpensive, customizable, semi-permanent option that can be moved if necessary, but you do need to gather the pieces and assemble the frame yourself.
2. Wall-Mounted Rebar Trellis: Turn a Blank Wall Into Growing Space
A block wall offers a lot of unused vertical space, but plants need something to hold onto. I have several narrow rebar trellises mounted along my walls to provide that structure.
A neighbor made mine by welding horizontal pieces of rebar across upright pieces. Small attachment tabs are welded onto the frame, and those tabs are screwed into the wall.
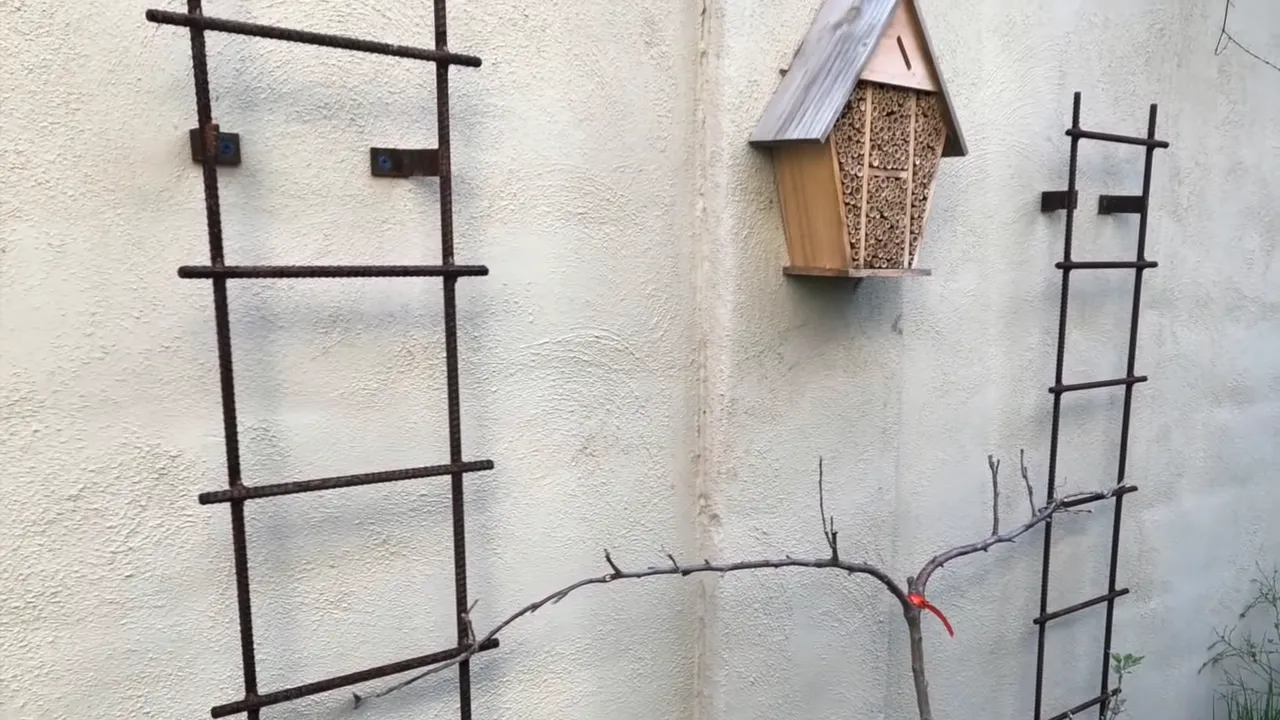
The design is straightforward and can be customized to the area you want to cover. I’m not a welder, so this is a project I had help with rather than one I built myself.
I also have a wider wall trellis that supports honeysuckle near the pool fence area. Once the plant fills in, the support nearly disappears and the wall becomes a lovely green backdrop.
The trade-off: Rebar is relatively inexpensive, and a welded design is secure and customizable. However, it requires welding and wall installation. Treat it as a permanent addition because removing it leaves attachment holes.
3. Pre-Assembled Trellises: Convenient, but Check the Support
A purchased trellis is an easy way to add height without building a frame from scratch. One of mine came from a home improvement store and has held up well, but it needed more support than the trellis alone provided.
We drove wooden supports into the ground and tied the trellis to them. It wasn’t fancy, but it made the whole structure much more secure.
Coral vine covers this area in the fall, making it difficult to see the support underneath all the leaves and pink flowers. At other times of year, the vine is green. In my garden, I cut it back to the ground in early spring after frost, which reveals the structure again.
The trade-off: Pre-assembled trellises are easy to install and can be moved, with prices varying by style. You do have to find a size that fits your space, and you may need to add anchors or supports.
4. Wall-Mounted Grid Trellis: Cover a Wider Area
For broader sections of wall, I use wire panels welded into metal frames. These attach directly to the wall and create a large grid for training plants.
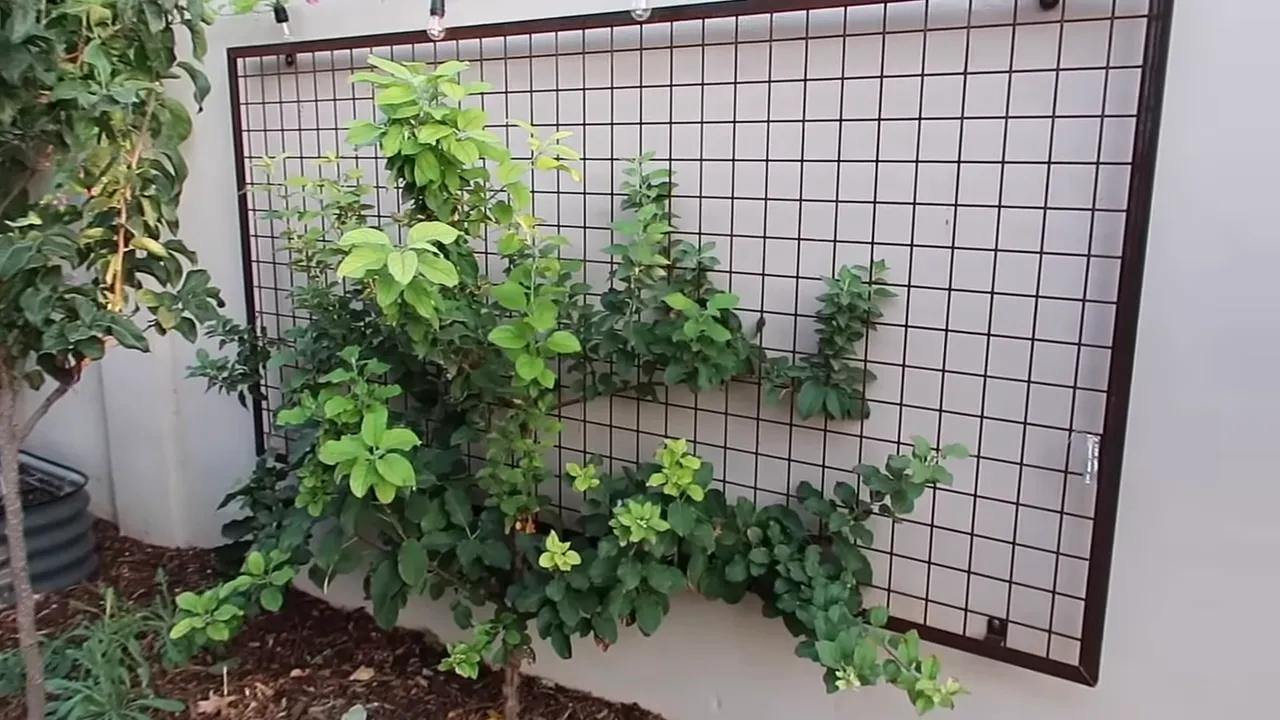
Compared with a narrow rebar trellis, the grid provides attachment points across a much wider surface. It’s a useful way to take advantage of a long stretch of block wall rather than leaving that space bare.
The trade-off: A welded frame can be customized to your wall, but it requires welding and secure mounting. Like the wall-mounted rebar trellises, this is a permanent choice that leaves holes if removed.
5. Raised-Bed Rebar Trellis: Support Crops and Seasonal Shade
Another neighbor-made structure in my garden is a welded rebar framework attached to the raised beds. The uprights rise beside the beds and connect overhead, giving crops room to climb up and over.
Each upright is secured to the bed, and diagonal braces provide additional support.
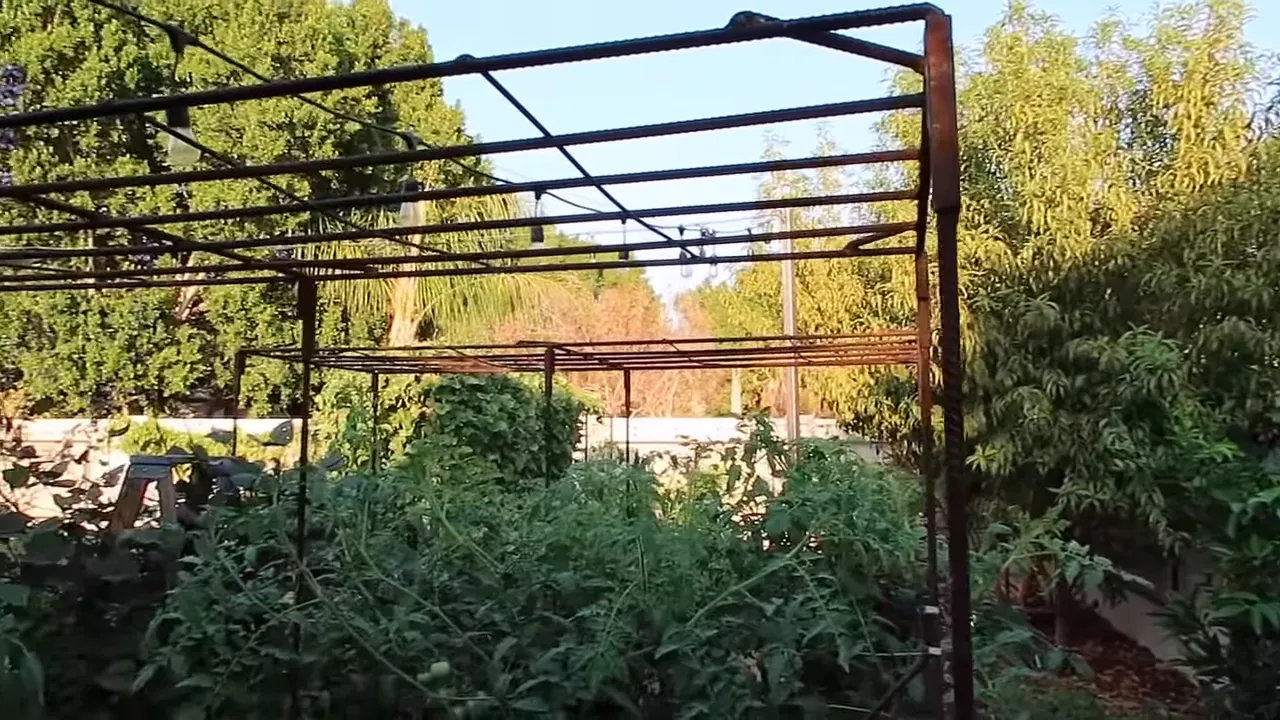
What I especially like about this design is that it serves two purposes. It supports plants, and when I need shade, I can add shade material across the top of the framework.
That flexibility is useful in my Arizona garden. The structure is already there when the season changes and the garden needs a little extra protection from the sun.
The trade-off: The materials are relatively inexpensive, and the frame can be designed around your beds. Welding is required, however, and how easily it can be moved depends on how it’s attached.
6. Old Ladders: An Inexpensive Way to Grow Up
An old ladder makes a wonderfully simple garden support. I have several tucked into the garden, including one covered in purple hyacinth vine.
Thrift shops are a good place to look, and different ladder sizes let you add height in different areas. There’s no custom frame to assemble, and the ladder adds some character even before the plants cover it.
The trade-off: Ladders are inexpensive, easy to place, and not permanent. Wooden legs will eventually rot when they stay in contact with soil, so they aren’t a forever structure.
For more examples, see my ideas for using ladders in the garden.
7. Jardin Rose Arches: Ready-to-Assemble Height Over a Path
The Jardin Rose Arches from Gardener’s Supply are a convenient option if you want an arch without arranging for custom metalwork.
They come in pieces and are fairly simple to put together. I like the spacing of the grid, and I’ve grown different crops on them over time. Mine are installed directly in the beds and have seemed fairly sturdy there.
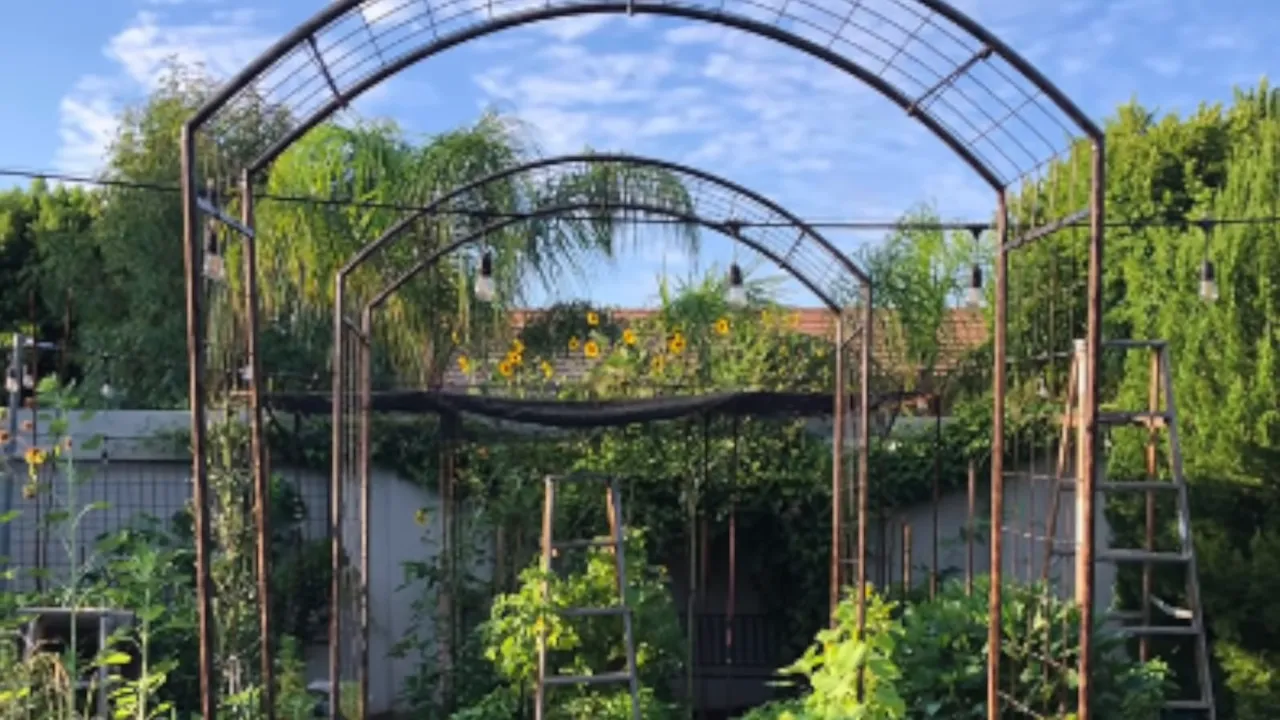
The trade-off: These are moderately expensive compared with simple DIY supports, but they’re easy to assemble and aren’t permanent. Depending on the installation, they may need additional support.
8. Poles and Stakes: Sometimes One Upright Is Enough
Vertical gardening doesn’t have to mean an arch, a tunnel, or even a grid. Sometimes a garden stake pushed into the soil is all you need.
I grow zucchini upright on a simple stake. The stake provides support, and I help keep the plant growing upward rather than letting it spread across the bed.
The trade-off: Stakes are inexpensive, easy to find, simple to install, and easy to store during the off-season. They provide a single support point rather than the broad climbing surface of a trellis.
9. Ladder Mesh Block Trellis: My Favorite Temporary Support
Ladder mesh block trellises check so many boxes for me: they’re inexpensive, easy to install, and temporary. I move them around the garden from season to season, especially in summer when there are plenty of vining crops looking for a place to climb.
Look for ladder mesh block in the concrete section of a home improvement store. It’s a narrow metal ladder-like piece that bends into an arch.
How to install one
- Push one end into the soil.
- Bend the mesh into an arch.
- Push the other end into the soil where you want the arch to finish.
That’s it. It really is one of the simplest ways to add vertical growing space.
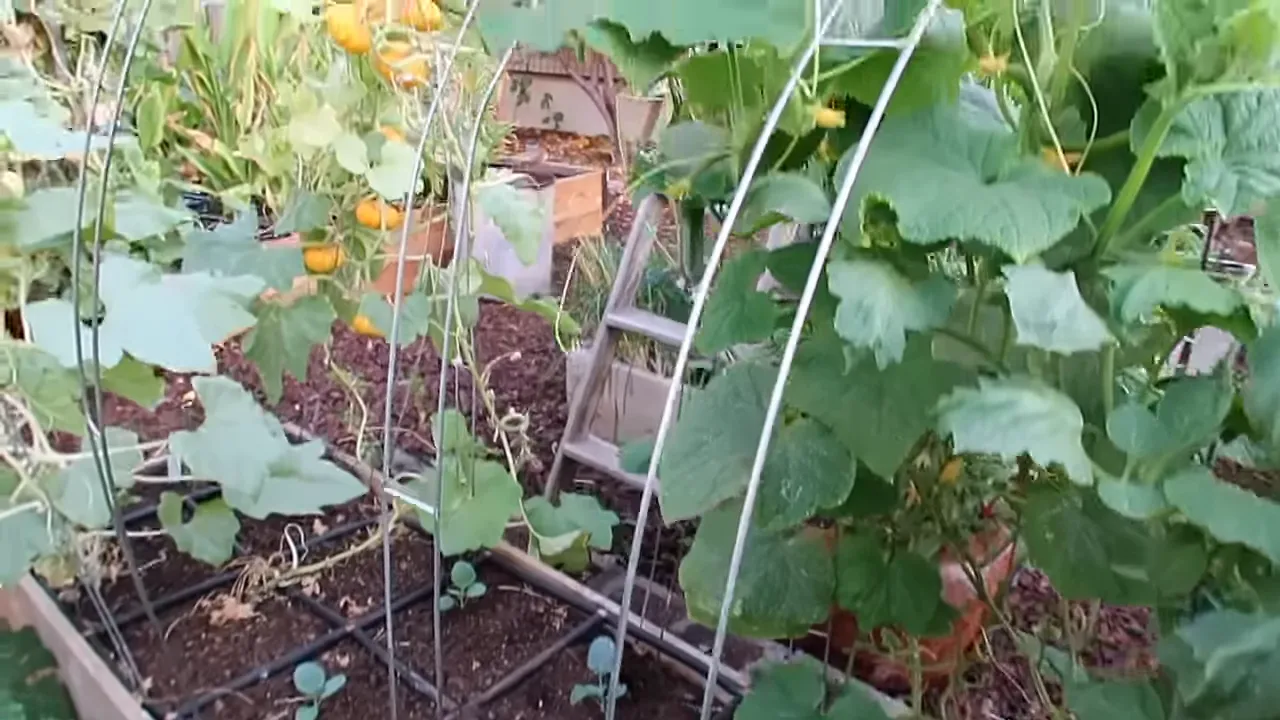
When I purchased mine, they were usually around $3 or $4 each. Prices can change, but the low cost is part of what has made them so useful throughout my garden.
A stack also takes very little storage space. Besides supporting vines, the arches can hold tulle or insect netting over plants. They can also support a suitable protective covering when frost protection is needed.
The trade-off: These are a simple seasonal support rather than a permanent garden structure. That’s exactly what makes them useful when your planting layout changes.
I share more details in my guide to adding vertical space with ladder mesh block trellises.
10. Vertex Cages: Add Support After Plants Are Growing
One of the biggest advantages of the Vertex cages from Gardener’s Supply is that I can put them around plants after they’re already growing.
That flexibility matters. Sometimes a plant gets bigger than expected, or I realize a little later that it needs more support. These cages can wrap around the plant instead of having to be lowered over it.
Although they’re sold as tomato cages, I use them for peppers and cucumbers too. I also have a tall version that has supported winter squash all the way to the top, keeping the vines off the ground.
The trade-off: They cost more than basic stakes or ladder mesh, but they’re lightweight, easy to store, and available in different sizes. I expect mine to last a long time, which helps justify the upfront cost.
11. Custom Welded Arches: A Permanent Garden Tunnel
For a permanent addition, I had custom arches built by Two Brothers Metalworks. I knew I wanted vertical growing space when I installed this section of raised beds, so the arches became part of that layout.
Three separate arches line up to create a tunnel. The frames are welded, and each upright is set in concrete. This structure is very sturdy. It isn’t going anywhere.
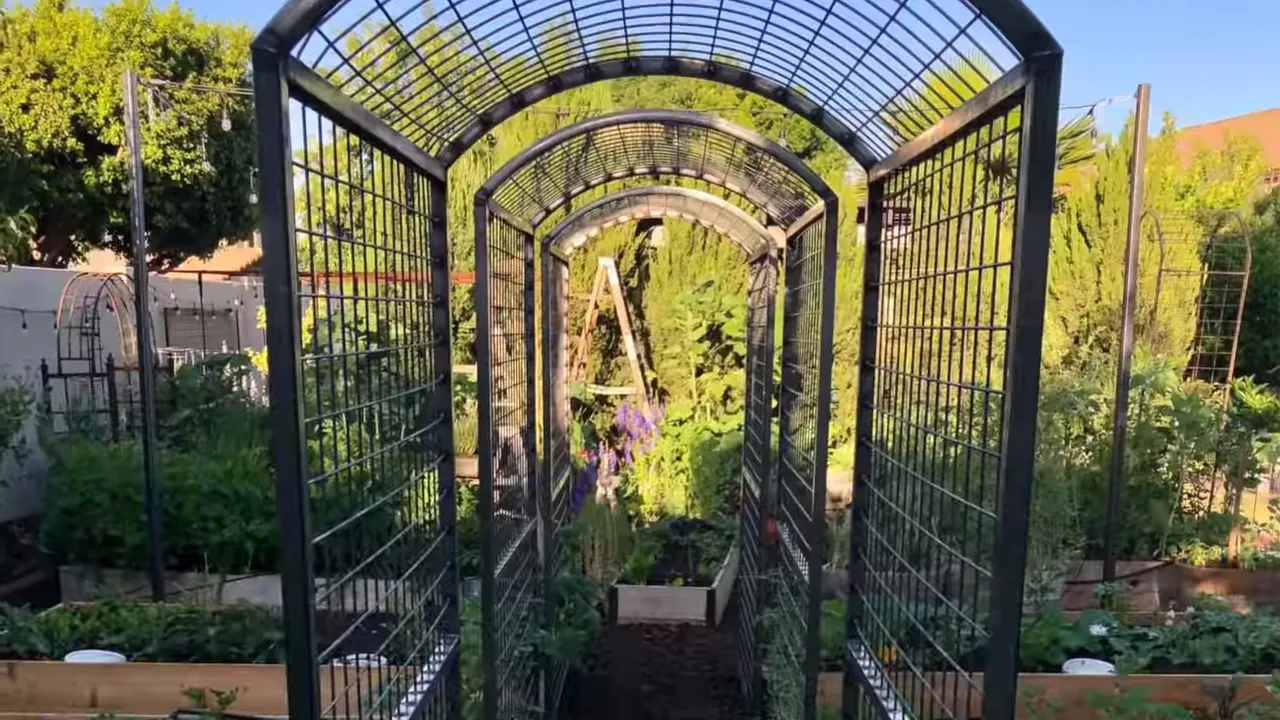
Even in its first growing season, the tunnel supported several crops. It’s the kind of addition I expect to use for many years, with different plants climbing over it as the seasons change.
The trade-off: Custom welded arches are expensive compared with the other options, and they require welding, tools, and permanent installation. In return, you get a secure structure designed for your space.
The Most Important Vertical Gardening Habit
No matter which support you choose, spend a little time with your plants each day. A trellis gives them somewhere to grow, but they may still need help getting there.
As you walk through the garden, look for a stem that needs another clip, a vine that needs tying, or new growth that can be gently woven through the trellis. A little attention along the way keeps plants moving in the right direction.
You don’t have to add every kind of structure at once. Start with a stake, a thrifted ladder, or a piece of ladder mesh. If you need a longer-lasting solution, consider a conduit frame, wall trellis, or permanent arch. The best support is one that fits your plants, your space, and your budget.


